To start experimenting with StoreKit’s in-app purchases in Xcode you really don’t need that much. You can start testing your in-app purchases at the early stages of development right in the Xcode, even before you configure your products on the App Store Connect.
Benefits of Testing In-App Purchases Early in Xcode
When implementing in-app purchases in your app it’s a good practice to start locally in Xcode before configuring products at the App Store Connect dashboard on the web. StoreKit provides an easy setup of the in-app purchases test environment in Xcode, so you can test ideas fast and spot issues early.
One of the biggest advantages of testing in-app purchases within Xcode is the flexibility it offers. Unlike the rigid structure of App Store Connect, your test environment in Xcode allows you to freely tweak the details of the products without any limitations. You can fine-tune in-app purchases to your heart’s content before setting things in stone on App Store Connect.
Another cool thing about testing within Xcode is that this local environment allows you to view the in-app purchases in SwiftUI’s preview provider while working things out.
Here’s what you need to do to start testing StoreKit in-app purchases in Xcode.
Create StoreKit Configuration File
We start by creating StoreKit Configuration File. This is a special kind of file used for testing in-app purchases at the early stages of development. Among other things, this is the file where you define your test products.
To create StoreKit Configuration File:
- Go to “File > New > File…” in Xcode menu or press ⌘+N (Command+N) shortcut on your keyboard.
- In the following dialog just search for “store” and select StoreKit Configuration File.

- Next, name your file. Unless you’ve already set up in-app purchases on App Store Connect, leave the “Sync with App Store” checkbox unchecked.

- Save the file somewhere in your bundle.
Define your products
Now comes the fun part: creating products (even if they’re just for testing). Select your newly created StoreKit Configuration File in the Project Navigator and add new products by clicking the plus button at the bottom left corner of the Editor area. Give each product a reference name and a unique product ID.
Apple has defined four types of products that can be offered as in-app purchases:
- Consumable – This is a single-use product that can be repurchased. The most common example would be in-game currency (coins, gems, etc.).
- Non-consumable – These are the products that can be purchased only once by a user and do not deplete or expire. For example, an upgrade to a premium version of the app, or removing ads for a fee.
- Non-renewable – This is a subscription product that grants access to content for a limited time and cannot be renewed. An example that comes to mind could be a online course or a live event.
- Auto-renewable – This subscription product allows access to a content for a set period of time and is automatically renewed unless canceled by the user. This is your classic streaming services and periodic publications.

It’s also a good idea to provide display names and descriptions for your products at this stage. This information will be used by StoreKit’s ProductView when displaying your products in SwiftUI.
Edit your scheme
To tell your app to use the StoreKit Configuration File, click the scheme name in the Xcode toolbar and select “Edit Scheme…”. In the Run scheme’s Options tab, choose your .storekit file from the StoreKit Configuration dropdown.

Interestingly, you can create multiple StoreKit Configuration files with different products and configurations, and easily switch between them by editing the scheme as described above.
Save Public Certificate
Xcode requires another special file: a Public Certificate. This certificate is essential for validating locally signed receipts generated when a purchase is made in the test environment.
Unlike other files created in Xcode, the StoreKit Public Certificate can only be generated with a StoreKit Configuration file selected in the Project Navigator. Select your StoreKit Configuration file and go to “Editor > Save Public Certificate”. In the following dialog, save the certificate file to a location within your project.
That’s it, you’re ready for testing in-app purchases locally in Xcode!
What’s Next?
With this setup, your StoreKit implementation will load the products defined in your StoreKit Configuration file. If you’d like a comprehensive guide on implementing StoreKit in a SwiftUI app, check out this article I wrote.
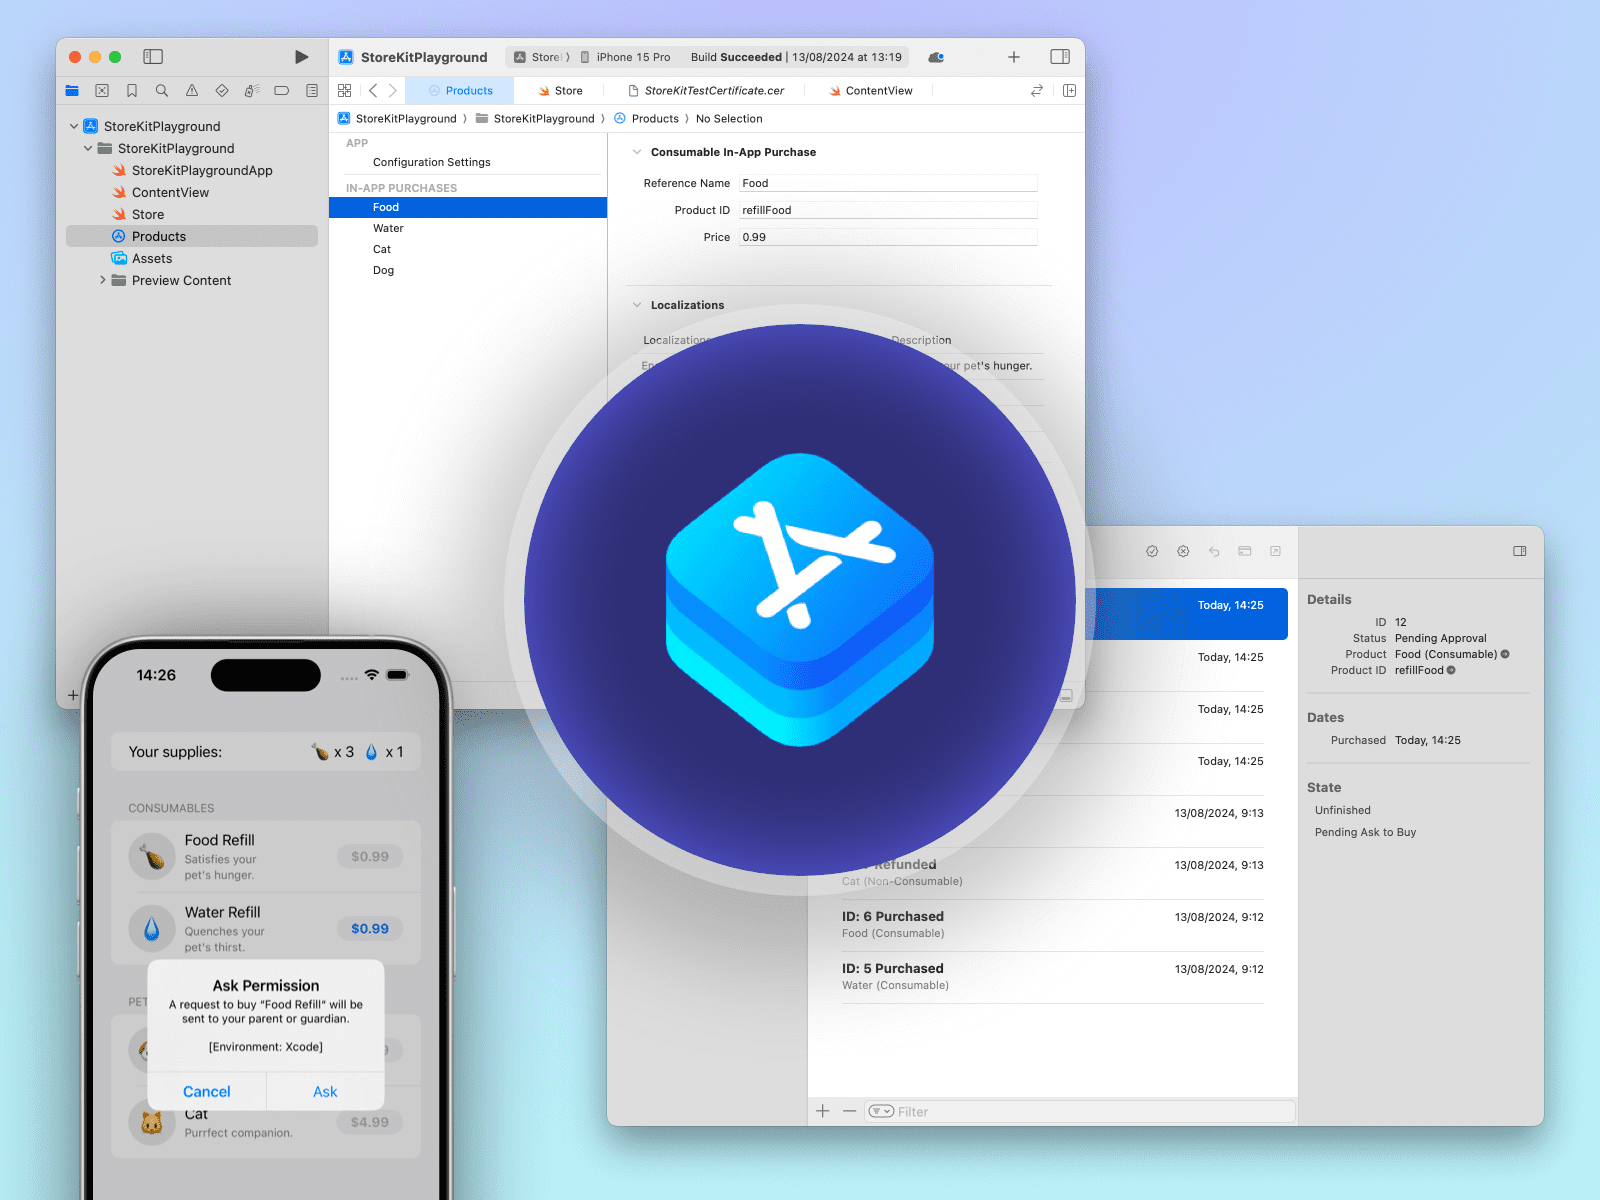
You can also leverage your StoreKit Configuration file to simulate various edge cases. For instance, you can mimic a pending purchase by enabling the “Ask To Buy” option under Purchase Options.
Additionally, you can test different error scenarios by checking the boxes under Simulated StoreKit Failures. The best part is that you can toggle these errors on and off while running your app in the Simulator, allowing you to see how your code responds to different situations.

You manage the purchases made in this test environment in StoreKit Transactions Manager, accessible through “Debug > StoreKit > Manage Transactions…” in the Xcode menu. With this transaction manager you can handle transactions in a variety of ways. For example, you can approve or decline the aforementioned “Ask to Buy” pending purchases, or test refunding a transaction.

Removing Local StoreKit Test Environment
Once you’re done testing, it is safe to remove the testing environment by following these steps:
- Disconnect your app from using the local StoreKit configuration file and return to using App Store Connect data by editing your scheme. Go to Options tab of the Run actions like before and choose “None” under StoreKit Configuration instead of your .storekit file;
- Delete StoreKit Configuration file;
- Delete Public Certificate file.
Ensure to remove any hardcoded references to the test environment or the StoreKit configuration file in your code.
Wrap-up
Testing in-app purchases locally in Xcode is invaluable for figuring things out and making sure your StoreKit implementation meets your business needs and satisfies the user experience you have in mind. I hope you found this guide useful. Happy testing!